
Saturday, October 10, 2009


Friday, October 9, 2009
Today's Friday Freebie


Scrapbooking Hints and Tips
Go Large
Larger than life photos can really make your pages stand out from the crowd. In order to make a layout really pop out in your album and grab the attention of the viewer, what can be better than making the photograph the main focus of the page?
Creating scrapbook layouts is all about trying to show your photographs off to their best advantage, so if you are going to go large do it in style and use a photo that is about 10" x 12 ".
Using a large image on a page takes up a lot of the free space and most people would think that there really isn't very much else you could do with the layout. Not the case at all. You still have more than enough space to soften the edges of the photo by using curved paper cutouts , clever use of journalling and elements.
Remember though that a layout like this can quite easily look fussy, so don't over embellish it, keep it simple.
Thursday, October 8, 2009
 Speed Scrap
Wednesday, October 7, 2009


Tuesday, October 6, 2009
Tuesdays Tips and Tuts
Welcome again to this weeks Tuesday's Tut! Brought to you by Riley Creations!
Blending
Step 1: You will need to select two pictures. I have chosen a picture of Kaitlyn and a background paper from my Color My World scrapkit.
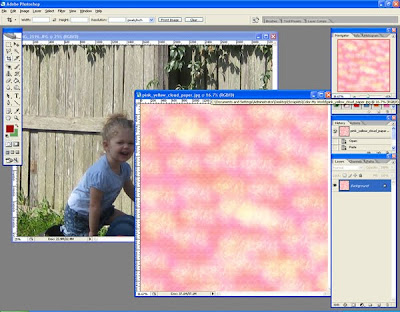
Step 2: Now, I want to blend Kaitlyn into the paper. So, go to the image that you want to blend and press CTRL+A to highlight the whole image. Now press CTRL+C to copy the image. Go to your paper image and do CTRL+V. It will paste is as a new layer.

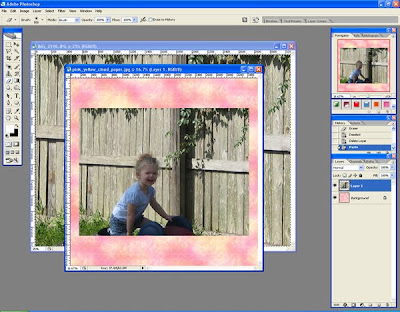
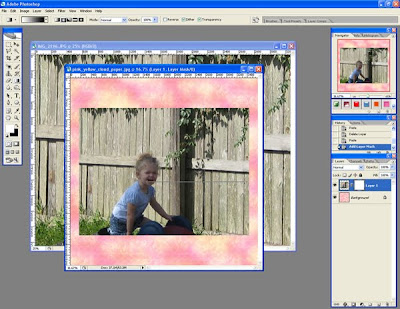
Step 3: Now we are going to add a layer mask to the picture of Kaitlyn. Click Layer 1 and then click Add Layer Mask. See below.

Step 4: Now we need to reset our colors to the default black and white. Press D to do this. Now select your gradient tool. Make sure you have the gradient set from foreground to background. I am also using the Radial Gradient since I want to blend the edges of the image into the background paper.

Step 5: Now, use the gradient tool to draw in the mask layer. Make sure you have the mask selected in the Layer window. Click in the center part of the image you want to remain visible and drag it to the outter edge of the image.
Step 6: Now, I don't know about you but I don't like how the edges blended. It needs to fade more. So, let's fix it. First you need to apply the mask to the layer. Right click the mask and choose Apply Layer Mask.
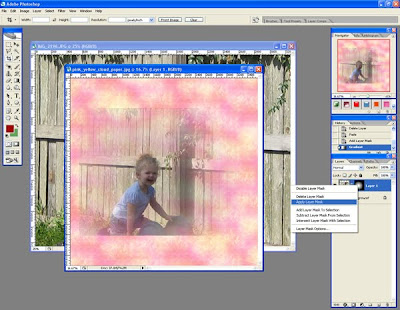
Step 7: Now, let's clean up the edges. Add another layer mask to the image. Select your Eraser tool and select a large feathered brush. I chose Shoft Mechanical 500 pixels. Just erase around the edges of the image so it isn't a sharp stop/blend into the background paper.
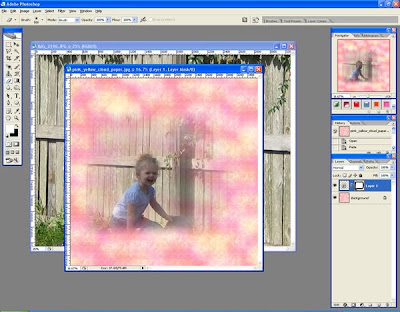
That's it. Easy peasy. Now you can blend two images together using the Gradient tool and Masks. Got questions? I shall try my best to answer them. I hope you enjoyed this tutorial. Check back every Tuesday for another new tutorial.
Blending
Step 1: You will need to select two pictures. I have chosen a picture of Kaitlyn and a background paper from my Color My World scrapkit.

Step 2: Now, I want to blend Kaitlyn into the paper. So, go to the image that you want to blend and press CTRL+A to highlight the whole image. Now press CTRL+C to copy the image. Go to your paper image and do CTRL+V. It will paste is as a new layer.


Step 3: Now we are going to add a layer mask to the picture of Kaitlyn. Click Layer 1 and then click Add Layer Mask. See below.

Step 4: Now we need to reset our colors to the default black and white. Press D to do this. Now select your gradient tool. Make sure you have the gradient set from foreground to background. I am also using the Radial Gradient since I want to blend the edges of the image into the background paper.

Step 5: Now, use the gradient tool to draw in the mask layer. Make sure you have the mask selected in the Layer window. Click in the center part of the image you want to remain visible and drag it to the outter edge of the image.

Step 6: Now, I don't know about you but I don't like how the edges blended. It needs to fade more. So, let's fix it. First you need to apply the mask to the layer. Right click the mask and choose Apply Layer Mask.

Step 7: Now, let's clean up the edges. Add another layer mask to the image. Select your Eraser tool and select a large feathered brush. I chose Shoft Mechanical 500 pixels. Just erase around the edges of the image so it isn't a sharp stop/blend into the background paper.

That's it. Easy peasy. Now you can blend two images together using the Gradient tool and Masks. Got questions? I shall try my best to answer them. I hope you enjoyed this tutorial. Check back every Tuesday for another new tutorial.


Monday, October 5, 2009


Monday Mania
Hello Everyone! ModernJune here giving you this weeks Monday Mania! We have some really great things hitting the store today and I can't wait to tell you about them!
I have a new kit coming out today called "Plucked Perfection"

This is a great kit! Look out for the add on kit too!
1 pink bow

6 glitter styles
Mandy Made has a special treat this week. She is unveiling her new CU products!


Now you can also get all of these in her "CU String Bundle" which is a great deal!


16 patterned papers
-8 plain papers
-2 alphas
-10 different apples
-1 apple border
-1 apple swirl
-1 rubber frame band
-1 basket full of apples
-2 buttons
-1 date wheel
-2 apple frames for date wheel
-2 frames
-1 mat
-1 ribbon frame band
-1 leaf scatter
-1 flat ribbon
-1 ribbon on clothespin
-1 ribbon with safety pin
-1 stick
-1 stitches
-1 curly string
-3 thick curly string
-2 word art tickets
-2 plain tickets
This is a great kit! Look out for the add on kit too!
Damsel Designs "Pink on Purpose" perfection for October which is Breast Cancer Awareness Month


1 pink bow
4 awareness ribbon charms (2 with pink, 2 with silver)
2 ribbon ties with eyelets
1 button
1 charm bracelet
1 charm bracelet with charms
1 curly ribbon1 glittery flower
2 flower with leaves
1 flowers and ribbon cluster
1 glittery outline of awareness ribbon
2 glitter borders
4 glitter corner swirls
1 silver heart tag
2 ribbon wraps
4 straight ribbons
1 ribbon flower
5 ribbon curls
4 sequins
1 string frame
2 glittery tags
1 cardboard tag with glitter and bow
1 silver wire
24 papers
24 papers
Damsel Designs "Pink on Purpose Glitter Styles"

6 glitter styles
Mandy Made has a special treat this week. She is unveiling her new CU products!
She has "CU Strings" for you today!


Now you can also get all of these in her "CU String Bundle" which is a great deal!

Sunday, October 4, 2009
 This is a dreamy elegant Lo by Kateinoz... just beautiful!
Next up is Sarah and her fab LO.... I'm loving her use of some many different papers here... not to mention a great title! Kit used is Roots by Mandymade available at the DSM store....

Here's a great LO by mom2twoangels... this is a great example of only using two colors in a LO, this can be tricky!!! Great job! Kit used is White Christmas by Scap Maniac available at the DSM store.
credits
 The next LO was done by Blessedby3qtz ... another great example of blending and love the fall colors and word cloud!
credits here.

I just love the photo cropping in this next LO done by Missdamsel... so awesome!

I just love the photo cropping in this next LO done by Missdamsel... so awesome!
Credits here.

Inafog created the next LO.. I love that she scraps in this size... makes for easy printing! I love the muted colors and the special memory captured....

Inafog created the next LO.. I love that she scraps in this size... makes for easy printing! I love the muted colors and the special memory captured....
credits

Next up is a wonderful LO by Stephieann... great use of color and paper strips!! Well done #1!! In this LO she used Damsel Design Rachel's Room available at the DSM Store...

Next up is a wonderful LO by Stephieann... great use of color and paper strips!! Well done #1!! In this LO she used Damsel Design Rachel's Room available at the DSM Store...
credits
 This is a smashing LO by Jrzybchmom... this is an excellent example of blending and use of word art and journaling!
 This is a smashing LO by Jrzybchmom... this is an excellent example of blending and use of word art and journaling!
credits

Here's another from Blessedby3qtz... wonderful journaling and photo placement!!! She used ModernJunes new kit Hocus Pocus!!!

Here's another from Blessedby3qtz... wonderful journaling and photo placement!!! She used ModernJunes new kit Hocus Pocus!!!


Saturday, October 3, 2009

Friday, October 2, 2009


Another Friday Freebie!!

Subscribe to:
Posts (Atom)


